The Motion Titler
| ||||||||||||||||||||
Studio’s Motion Titler is a powerful tool for creating and editing animated titles and graphics. Its extensive suite of text and image effects and tools provides endless possibilities for the visual design of your movie.
Although the Motion Titler has fewer tools in some areas than the Classic Title Editor, it excels in animation, special effects, usability and fun.
Note: The Motion Titler tool is available in Studio Ultimate and Studio Ultimate Collection only.

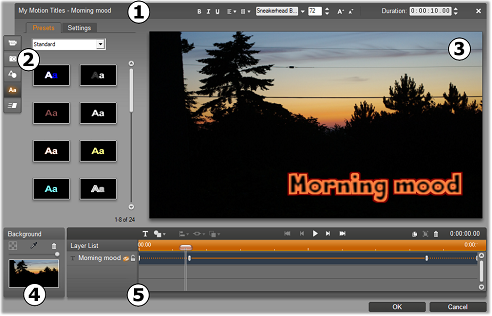
Areas of the Motion Titler display: Œ the Title Bar; the Motion Titler Album; Ž the Edit Window; the Background Panel; and the Layer List.
There are five main areas of the Motion Titler display.
1. The Title Bar has four parts with, from left to right: the category and name of your title; a set of text manipulation controls; a duration counter field; and a close button, which has the same effect as the OK button in the bottom right corner.
2. The five sections of the Motion Titler Album provide resources for building your titles. The first two sections, Videos and Photos, are local versions of the like-named sections from Studio’s main Album, with the same controls. The others – Objects, Looks and Motions – contain specialized resources for motion titles.
3. The Edit Window is your main work area when authoring or editing a title. It provides a scrubbable preview of your title with hands-on editing.
4. Each motion title has a background layer, which you can either edit using the Background Panel or leave transparent.
5. Each graphic or textual element constitutes a layer in the title. The opaque parts of each layer obscure the layers below; the bottommost layer can obscure only the background. In addition to listing each layer by name, the Layer List includes an animation timeline showing which motions have been assigned to each layer. Durations on the timeline can be adjusted by dragging.
The process of building up an image in layers is called ‘compositing
The Motion Titler
